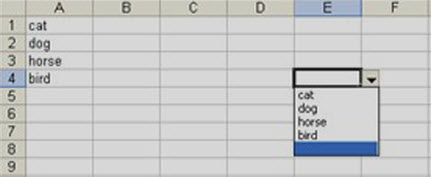
Today Best Tip: Adding a drop-down list into the Excel
In Access, you can restrict user entries, forcing the user to select a value from the list control. Office applications (Android Office) use the same function, the built-in drop-down list. For example, highlights and font color control most of the formatting toolbar to use this flexible tool. Just click on the right icon to display a selection list of the small triangle.
You can create the same type of control the user in an Excel worksheet, but this process is not intuitive. This option is in the data validation. Fortunately, once you know the feature exists, it is very easy to implement. You only need two things: a list and data entry cells.
The table below shows a simple drop-down list in an Excel worksheet.
User clicks the down arrow to display a list of items, from A1: A4 (Cell Range). If the user tries to enter something that is not in the list, then Excel will reject the project. To add the drop-down list of the table, do the following:
1. Create a list in cells A1: A4. Similarly, you can enter a single line items, such as A1: D1.
2. Select cell E3. (You can use any cell or multiple cells drop-down list).
3. From the "Data" menu, select "verification”.
4. From the "Allow" option of the drop-down list, select lists (See, they are everywhere)
5. Click the source control and drag to highlight cells A1: A4. Also, simply enter the reference (= $ A $ 1: $ A $ 4).
6. Ensure cell dropdown option selected. If you uncheck this option, Excel still forcing the user to enter a list of values (A1: A4), but it does not appear a drop-down list.
7. Click "OK".
You can add multiple cells to the drop-down list. Select the data input cell (step 2), instead of a single range of cells. It may not even contiguous cells. Hold down the Shift key while clicking the appropriate cell.
It is worth noting, is visible only when the drop-down arrow in the active cell.
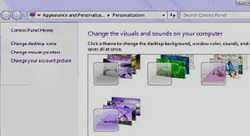
Customization and Access Hidden Themes in Windows 7?
Today tips:
Windows 7 provides a good sense of theme customization. Windows 7 features the location and language of your choice, and you install Windows 7 is based on a specific topic. You can look at the location of a specific topic in the Personalize menu. You just need to right-click anywhere on your computer desktop. You will be able to based on your location, get a few topics.
In addition to the location of a specific theme, by default, you will get, you can Windows 7 provides access to other areas of the hidden themes. So you get based on the default theme in your area is not the only theme, you can use. It can be easily accessed on your system hidden in the Windows 7 theme. This is what you must do:
Click "Start"
Your Windows Explorer will display a window with other topics. These will be from the UK, AS and Canada
You can choose to select only wallpaper, or if you prefer, you can install the entire theme.
Just double-click to install an entirely new theme.
You add a new theme will appear in the "My Themes" in the "personalized" pane.
You can also download many for Windows 7 themes from different sites, including Microsoft's (updates) website. But you should first try for the customized theme and access the hidden themes in Windows 7, you may not feel the need to download from somewhere else.
HIDDEN THEMES
How to disable Windows 7 delete confirmation dialog
Today Tips and Tricks:
Delete confirmation dialog box appears every time when you give a command to delete the file. However, there are times you delete a lot of unnecessary files to clean up your hard drive. This delete confirmation dialog will really bother you at such a time, you want to get rid of it, because it takes a lot of time, but you want to delete a large number of files.
There is a simple way to disable the delete confirmation dialog box in Windows 7. As you can disable the delete confirmation dialog box in Windows 7, you will be able to save a lot of time. However, we recommend that you do not disable the delete confirmation dialog box in Windows 7, unless it is really necessary. You should put it in your computer after completion of cleanup.
Follow these simple steps to disable Windows 7 delete confirmation dialog:
Right-click the Recycle Bin icon
From the menu that appears, select "Properties."
"Recycle Bin Properties" dialog box will appear. Uncheck "Display delete confirmation dialog at the bottom.
Click Apply, and then "OK" button.
You have successfully disabled in Windows 7 delete confirmation dialog. Open it again method is also very simple. Just follow the steps above, check the Display delete confirmation dialog.
You May Also Like:
Lenovo ThinkPad, increasing the hot-swappable batteries
How to prevent modifications in Windows 7 icons and cursors theme?
Today tip and tricks are going to tell you about Windows 7, allows users to select a variety of topics, through thematic functions. When we change the theme, icons and mouse cursor to be modified accordingly. Some of us do not like to modify our changing themes icons and mouse cursors. We hope that we have chosen icons and cursors remain unchanged, even in the new theme. It prevents modifications in Windows 7 icons and cursors themes. There is a simple way to prevent modifications in Windows 7 icons and cursors themes.
Follow these simple steps to prevent modifications in Windows 7 icons and cursors topics:
Right-click anywhere on the desktop
Select "personalized"
Click on the left side of the window screen "Change desktop icons."
Desktop Icon Settings "dialog box will appear. Uncheck the check box" Allow subject to change desktop icons"
Click Apply.
Click the "OK" button to close the dialog box.
Many people do not mind if the new theme to change the icons, but they prefer the mouse cursor remains unchanged. You can follow the same steps to change the mouse pointer theme prevent some changes.
Follow steps 1 and 2.
Just click "Change mouse pointers" link from the "personalized" window.
Mouse pointer dialog box will appear. Deselect "Allow themes change the mouse pointer."
Click the Apply button.
Click the "OK" button to close the dialog box.
How to burn a data CD in Windows 7 or data DVD using the media player?
In today tips and tricks we will tell you that With the media player, you can burn a data CD in Windows 7 or data DVD. Audio CD can contain only about eight minutes of music. On the other hand, if you are in Windows 7, burn data CD or data DVD using Media Player, it will be able to accommodate countless hours of music. Video files and images can also be added to the data disc.
Advantage
When you are in Windows 7 Burn data CD or data DVD, Windows Media Player is not selected files into a different format, you save them to a blank data disc, so stay a file in a compressed state. This allows you to spend more on a CD-ROM project.
Unaltered file format, file quality remains unchanged.
You can write a data CD or DVD in Windows 7 using Media Player as follows:
• Click "Start."
• Click All Programs.
• Select the Windows Media Player.
• Player Library, click the "Burn" tab.
• Click "Burn" option, and select Data DVD or CD.
• Insert a blank CD to computer's CD or DVD writer.
• Turn off Autoplay dialog box, if it is coming into sight.
• Some people on their computers have more than one CD-ROM drive. If you have more than one on your computer CD drive, select the one you want to use in the navigation window.
• Find the songs you want to burn.
To make your burn list, the details pane, drag songs to play a central library, which is in its right pane.
• You can also change “items order” in the burn list, in the list, drag up or down.
• To remove a song from the list, simply right-click the item and click Remove from list.
• After making your list, when clicked, starts to burn.
It may take some time to burn data discs. If you select an item does not fit on a single disc, you also have the remaining items of different disc burning options. The data is not the same as DVD-Video discs, such as DVD movies DVD from the store to buy or rent.
How to Create a Business Letterhead in Microsoft Word 2007 and 2010
Today Best tips:
Microsoft Word offers the ability to create a letterhead. In addition, it allows you to create your choice of fonts and styles. Stationery can be saved as a template so that it can be reused other letters.
In this step by step, you will see how to create a Microsoft Word 2007 letterhead.
Microsoft Word 2007
Step 1:
Open in Microsoft Word 2007
Step 2:
Enter the information you want, including on letterhead. Let's create a file called XYZ company letterhead.
Step 3:
After you enter all the information you wish to include in the letterhead, you can now formatted information, so that it looks like a letterhead. According to your requirements, you can format the letterhead.
Select all or part of the input you want to format the text.
Depending on your requirements, now select the font style and size.
Depending on your requirements, you can choose to further align the text. You can choose to keep the page on the left of the font, or center text, you can even choose the right alignment.
If you want to remove the spacing between the lines, then you can simply change the style from the "Style" box, select "No spacing”.
If you want to separate the rest of the body, so that a line across the page just below the letterhead stationery, you can easily do it from the paragraph the "Home" tab.
Just click Borders drop-down button, and from the drop-down menu at the bottom border.
Here is how it looks like you should separate letterhead, the border line for inclusion.
Step 4:
Microsoft Word you can make your choice, you save letterhead. Once you have formatted the letterhead according to your requirements, you can save it as a template, simply open the template again when you want to reuse.
The given instructions explain you how to save the letterhead template, so that it can be reused in the future.
1 . Click the Microsoft Word Office button in the upper left corner.
2 . In the menu, hover over "Save As"
3 . In the menu on the right pane, click the "Word templates”.
Once the " Save As" window opens, enter the name of your letterhead template. From the left pane of the window, be sure to select "Templates" folder. Click Save to save your letterhead.
Step 5:
Although we have completed this step is to create a letterhead, including a description of how to access the letterhead, we just saved as a template.
Open a Microsoft Word 2007. Click the Office button, and then click New. From the "
New Document" dialog box on the left , click on " My Templates".
Now select the template you just created, and then click OK.
You will now have a new file, according to the letterhead template you just created.
You May Also Like:
Latest News and information
Have you lost your smartphone or tablet locked? how to get it back ...
An excellent point, released by Apple on Tuesday 50 percent of people lock their iPhone I am very surprised that this is the high - it seems to me every week to someone, said: "The man child, you really do not lock your phone?
Anyway, I thank Apple put more conscious about the importance of locking portable devices. After all, your whole life in there - it really should be locked, no matter how many dozens of times a day you enter the password.
Lock your smartphone or tablet to create a problem, though. You how to get it back, if you lose it?
Old style
Do here is the most simple things that your lock screen, so your contact information. That way, when someone found your phone, they see the contact information and call you another number.
Someone suggests me the option is that you use the "Find me forget" functionality provided by the platform, and use it.
However, this is only the work of Wi-Fi devices, like my iPad It might be better to work with smart phones is undeniable, but think about this for a moment. If you have lost your phone, you want this to be really, really easy. Do you want anyone pick up your phone and get it back to you. Message on the lock screen is the easiest way to do it.
Old School BlackBerry OS 7 handsets, which has been a feature (In fact, you could
push it in your purview all the equipment as a corporate policy) Weird because we only have the device render "If you lose this wonderful idea to turn to the current generation of post-PC devices". Information to the lock screen and not a new era.
If you do not want to spend any money, you want to play with, photographs and contact information in Photoshop. Then set the lock screen background image. In my iPad Here is an example In the Picture shown below.
You can get the application , make this easier .
• On iOS , there are some out there - I found this morning, if you find the lock screen .
• on Windows Phone has lost phone screen , which happens to be put together to promote the development by Microsoft Scott Hansleman.
Part 2 : Creating an Android phone
Part 3 : Finding your cell phone


How to rapidly repair your Mobiles when dropped into the water?
Many of you get your phone wet through one way or another. Are you worried that you mistakenly drop your phone in water. It also wet, if you are in a heavy rain. However, there is no need to panic. It is possible, and quickly repairing save your wet cell phone. To save your phone, water damage, you can consider these easy and simple solutions:
Act quickly:
You have to do first thing in order to save your wet cell phone is to act quickly. Quickly remove all removable parts, as well as covering the back cover, battery, SIM card, memory card, etc. Next, take a cloth or paper towel wipe off the excess water, you can notice a mobile phone. Make sure you completely dry. If you don 't do it, the phone begins to evaporate the water inside, and gather it will be difficult to reach places.
This will save your wet cell phone, it will start to work if it is in the water just a little while.
Use a hair dryer:
A hair dryer and drying of mobile phones, but also allow more consideration to the place, the battery is located begins. Battery shell usually tiny holes, so that the air (water, thus providing more space) of the mobile phone.
Make sure you are not holding the phone very close to a hair dryer. Remain too close to the mobile phone may harm the electrical mechanism. Remain dry for about twenty to thirty minutes, the mobile phone from a safe distance.
If the solution, the 1st and the 2nd solution does not work, try solutions on the 3rd.
Drying for a long time:
The cover removed, and from the mobile phone battery. The phone, as well as in a dry warm place to allow the gradual evaporation of moisture inside the phone from the phone's small hole.
